Your First Week in OS Journey
This week, your mission is to help a new engineer at the cloud company, Datadog.
Meet Niko!! He’s a vegetable bird (菜鳥), and is a little nervous about his first big assignment. His boss, Nini, asked him to play with a virtual mini-cloud before he is allowed to touch a real client’s production environment.
Your job is to follow Nini’s instructions and help Niko succeed. Ready?
A Bubble Within a Bubble
Nini: “At Datadog, we manage big, complex cloud systems. Your training starts with a small, safe version. You’ll work inside a Docker container on GitHub Codespaces. Inside this container, you will use a tool called a hypervisor (QEMU) to launch three fully independent Virtual Machines (VMs). Essentially, you’re building a bubble inside of another bubble.”
Niko: “A bubble in a bubble? And what’s the difference between a container and a VM?”
More info: Container vs. VM Differences.
Nini: “Great question! Let me put it this way…”
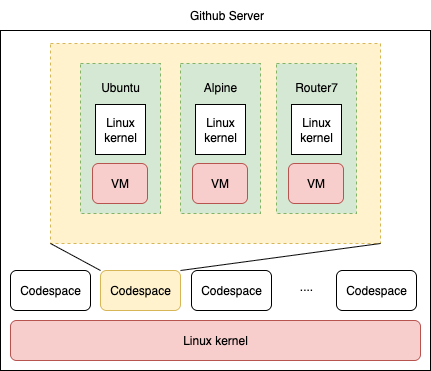
Think of the giant GitHub server as NTHU’s main campus: it has one central operating system, the kernel.
Our Codespace container is like the CS Department building on that campus. It’s an isolated space, but it still shares the main campus’s resources and underlying kernel. If you look around from inside the CS building, you only see CS stuff; you don’t see the activities of the Physics or Chemistry departments.
Now, the magic starts. Inside our CS Department building, we will create three brand new, tiny, simulated universities. Each Virtual Machine (VM) is a whole new mini-university, with its own kernel.
- A mini-NTHU (
DebianVM) - A mini-NTU (
AlpineVM) - A mini-NYCU (
Router7VM) (交大的確是台灣學術網路的骨幹喔)
Our container just shares a kernel, but a VM is a whole new kernel.
In this mini-cloud, the Debian and Alpine VMs will act as servers. All their traffic will pass through the Router7 VM, which works just like a Wi-Fi router at home (which also runs a Linux kernel!).
Set up Your Mini-cloud
Click the button below and click “Create Codespace”. This will open a web-based VS Code devcontainer on Github.
![]() .
.
It might take a minute or two for the Codespace to build. Once you see a VS Code interface with a terminal at the bottom, you’re ready to go.
In the terminal, run the setup script. This will download the three VM images we need (router7, debian, alpine) and install the QEMU hypervisor.
./setup.shWait for the script to finish downloading and setting everything up.
Booting the Network
Our mini-cloud uses the router7 router to connect everything. The router7 image is a cool, lightweight Linux system running a custom router program written in Go.
Let’s boot it up!
./run-router7.shWhen the OS boots, you will see a bunch of messages. Wait one minute and just press Enter to get a command prompt.
Now, let’s inspect the router’s network interfaces.
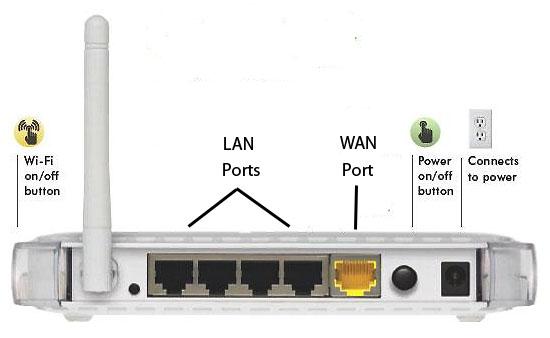
ip aDo you see uplink0 and lan0? A real-world home router usually has one “WAN” or “Internet” port (the uplink) and several “LAN” ports for your home devices (the downlinks).
One important job of an operating system is to manage I/O device. Each of the network interface is an I/O device.
The router7 image comes from the QEMU Advent Calendar 2023, which has tons of other fun and quirky VM images. Feel free to explore them on your own time!
Launching Your Servers
Now that the router is running, let’s launch our two “server” VMs: a Debian VM and an Alpine Linux VM. Both runs the Linux kernel, but Alpine is very small and lightweight.
First, open a new terminal in VS Code. You can do this by clicking the + icon in the terminal panel.
In this second terminal, run the Debian VM:
./run-debian.shWhen prompted for a login, use these credentials:
- username:
root - password:
root
Next, open a third terminal (click the + again) and run the Alpine VM:
./run-alpine.shLog in with the same credentials:
- username:
root - password:
root
You should now have three terminals running: one for the router, one for Debian, and one for Alpine.
Making Connections
Let’s see if our machines can talk to each other.
Find Debian’s IP Address: In the Debian VM terminal, run
ip ato find its IP address. It will likely be something like10.254.0.203.Connect from Alpine to Debian: Now, switch to the Alpine VM terminal. We’ll try to log in to the Debian machine using SSH. Replace
[ip address of debian]with the actual IP you found in the previous step.
ssh root@[ip address of debian]ssh is how you will connect to servers everywhere. See MIT’s explanation.
Checking the Router’s Records
How did your Alpine and Debian VMs get their IP addresses? The router runs a DHCP server that offers IP addresses to OSs that join the network.
Switch back to the router7 terminal. The DHCP server’s lease records are stored in a JSON file. Let’s view its contents.
cat /perm/dhcp4d/leases.jsonYou should see entries for both the Debian and Alpine VMs, listing their MAC addresses and the IP addresses the router assigned to them. Something like this:
# cat /perm/dhcp4d/leases.json
[
        {
                "num": 144,
                "addr": "10.254.0.146",
                "hardware_addr": "52:55:00:aa:00:11",
                "hostname": "localhost",
                "hostname_override": "",
                "expiry": "2025-09-01T23:47:22.401988058-04:00",
                "last_ack": "2025-09-01T23:27:22.401993257-04:00"
        },
        {
                "num": 201,
                "addr": "10.254.0.203",
                "hardware_addr": "52:55:00:aa:00:10",
                "hostname": "os25",
                "hostname_override": "",
                "expiry": "2025-09-01T23:42:30.108212438-04:00",
                "last_ack": "2025-09-01T23:22:30.108216646-04:00"
        }
]
The Magic of Virtualization
Let’s do one last thing. Open a fourth terminal in VS Code. This terminal is for the host Codespace environment, not one of our VMs.
Run the htop command to see the system’s resource usage.
htopLook at the the CPU usage bars on top-left corner. Most Codespace instances have only 2 CPUs. Yet, we are running three separate VMs, and if you check their configurations, each might believe it has 2 virtual CPUs (vCPUs) all to itself! We could launch even more!!
Think about it:
- How is it possible to run so many “virtual CPUs” on a machine with only 2 physical CPU cores?
- What do you think would happen to the performance of all the VMs if one of them started running a very CPU-intensive application (like a game)?
Promising more CPUs than you physically have: this is called over-subscription. Over-subscription appears everywhere. This is how Google is able to host more than thousands of Colab container on one single server, but each container thinks he is the only person in the world. This saves company a lot of money.
Mission Complete!
Thanks to your help, Niko has successfully completed his first training mission!
More Adventures in the OS Jungle
The OS jungle is big and full of fascinating OSs. Check out the v86 Project.
This amazing project is an entire x86 PC emulator written in JavaScript. That means it can boot and run old operating systems directly in your web browser, no server required! (Github Codespace’s VS Code is running on Github cloud, but v86 is truly entirely running on your own computer).
Go ahead and try booting up some of the classics:
- Windows 98
- MS-DOS
- A very old version of Linux (e.g., DSL)
- ReactOS (an open-source clone of Windows)